Remove a Ground Wasp Nest
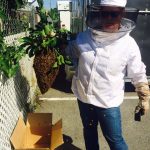
Removing a ground wasp nest can be a daunting task, especially if you’re not familiar with proper techniques. Ground wasps can become aggressive if they feel their nest is threatened, so it’s important to handle the process carefully. For residents in San Jose, CA, The Honey Ladies offer expert advice and services for dealing with wasps, bees, and other stinging insects. If you’re planning to tackle a ground wasp nest on your own, here’s how to do it safely and effectively.
Identifying Ground Wasps
The first step in removing a wasp nest is identifying the type of wasps you’re dealing with. Ground wasps, which often include species like yellowjackets, build their nests underground, usually in abandoned rodent burrows or other small cavities. The entrances to these nests are small and often surrounded by a lot of wasp activity during the day. It’s essential to confirm that you are dealing with wasps and not bees, as bees play a vital role in pollination and should be relocated by professionals like The Honey Ladies rather than exterminated.
Step-by-Step Guide to Removing a Ground Wasp Nest
1. Gather the Necessary Equipment
Before you begin, you’ll need to gather the right protective gear and tools. You’ll need:
- Protective clothing that covers your entire body, including gloves, long sleeves, and pants.
- A bee or wasp suit if possible.
- A flashlight (if you’re working at night).
- Wasp insecticide or a natural wasp repellent.
- A bucket of water and dish soap for a natural solution.
- Heavy rocks or a tarp.
2. Wait for the Right Time
The best time to approach a ground wasp nest is at night or early in the morning when the wasps are less active. During this time, most of the wasps will be inside the nest, and they will be less likely to sting. Make sure you have a flashlight covered with red cellophane, as wasps are less likely to be attracted to red light.
3. Apply Insecticide or Natural Repellent
Once you’ve located the nest entrance, carefully apply an insecticide designed specifically for wasps. If you prefer a more eco-friendly approach, a mixture of dish soap and water can be poured into the nest. The soap will coat the wasps’ wings, preventing them from flying and eventually leading to their demise. Be sure to do this quickly and step back immediately to avoid any wasps flying out of the nest.
4. Seal the Entrance
After applying the insecticide or natural solution, it’s important to seal the nest. You can do this by covering the entrance with a heavy rock or a tarp. This prevents any surviving wasps from escaping. Be cautious when doing this, as there may still be active wasps near the nest.
5. Monitor the Nest
Over the next few days, monitor the area to ensure that no wasps remain active. If you see continued activity, you may need to repeat the process. However, after a successful treatment, the nest should be inactive, and the wasps will either die off or move to another location.
When to Call a Professional
While it is possible to remove a ground wasp nest yourself, there are situations where calling a professional like The Honey Ladies is the safest option. If the nest is in a high-traffic area, near your home, or if you have a wasp allergy, it’s best to leave the task to experts. The Honey Ladies specialize in the safe removal of bees and wasps, ensuring that you and your family remain safe during the process.
Removing a ground wasp nest requires careful preparation and a bit of courage. By following these steps, you can handle the situation safely and effectively. However, when in doubt, always turn to professionals like The Honey Ladies in San Jose, CA, who have the expertise and tools to remove wasp nests while keeping the environment and your safety in mind. Whether it’s bees or wasps, The Honey Ladies can help manage these stinging insects with ease.
Prev Post The Enjoyment of Being a Beekeeper
Next Post What Happens to Bees During Winter?